%20white%20b.png)
Easter Pop Up Card
- Apr 8, 2020
- 3 min read
Another art lesson brought to you by Danielle's Hive of Creativity


Supplies:
Construction paper (Or cardstock, or any other sort of paper)
Scissors
Ruler
Glue stick (or white glue will work)
Pencil
Markers (Or other things to color with)

Objectives:
Increasing fine motor skills
Encouraging self expression
Understanding themes
Directions:
Your first step is to choose the paper you want to work with. For my card I decided to use green construction paper so I could create a grassy background. I then choose a blue piece of paper I could cut to create a sky. Use this opportunity to teach your children about themes. What colors come into mind when we think of Easter? Explain how colors work together and how colors effect our emotions.


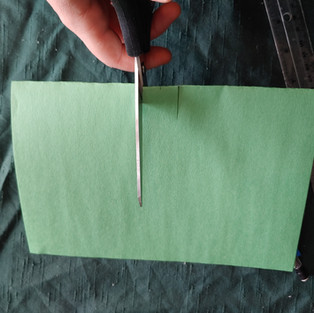


Fold the construction paper in half to create the size of your card. I then measured into the middle of my folded paper. In the center I cut an inch into the paper so I could pop out the center piece. (You can create this strip as big or little as you want and you can always make more than one. Creating a pop out effect is actually very easy!)

I then took my blue paper and made a wave cut so it would look like there are hills in the foreground of my spring scenery. Then glue this piece down. Cutting is a great way for children to increase fine motor skills. You will want your child is use safety scissors or you should monitor them closely if they are using sharp scissors.
It is now time to create some pop up grassy pieces that will hold the Easter eggs.


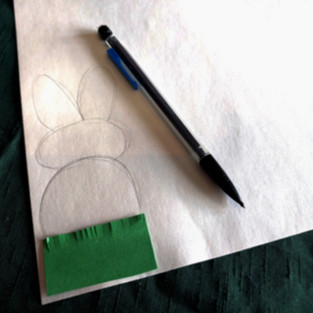
I made a rectangle that was 2 inches in width and 1 inch in height. This rectangle will go on the center pop out piece for my bunny rabbit. I made three larger rectangles that are 3 inches in width by 2 inches in height- these will be folded in half and detailed so the eggs can be glued on to them, they will then pop up on the card.

To detail these you can make small cuts into the top and fray the paper or make another wave cut to create a bush shape.
Now that your bushes have been made you can create some eggs to glue on to them. I used the size of the rectangles to gauge how big my eggs will be.


I used my first drawn egg as a template for the rest of my eggs. You can then color designs on the eggs before gluing them to the bushes.

Glue the undersides of the bush strips and adhere them to them to the card.
The next step will be creating a bunny to put in the center. You could print out a bunny template but I free handed the drawing. This is a good time to teach children about shapes and how shapes come together to create pictures. I used my small rectangle piece to decide how big my bunny would be.


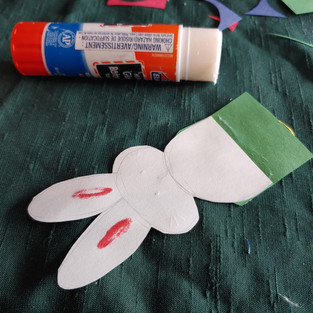
Decorate your bunny as desired, cut out and glue on to your rectangle strip.

Glue the bunny on to the center pop out. I then embellished my card a bit more by adding a cloud and sun in the background. You can do which ever details you want or your child can color on the card too.
The final steps will be creating a cover for the card. Choose a full piece of construction paper to glue on to the front and back side of the card.


I decided to go with a pink construction paper for my cover. Fold in half, cover the sheet in glue and adhere to the card. You can then decorate the front and back however you desire.

There you have it! A simple and fun pop up card.


Comments